Step 0: Setup
Step 0a: Log in to JupyterHub
- Visit https://
hub .cryointhecloud .com. You may want to bookmark this page! - Click “Log in to Continue”. This will log in with your GitHub account.
- On the “Server Options” page, select the last option, “Bring your own image”.
- Copy/paste
ghcr.io/geojupyter/geojupyter:latestinto the “custom image” field. - Leave “Resource Allocation” as default (1.9GB RAM).
- Copy/paste
- Click “Start”!
- It may take a moment for the server to start. When it’s done, place a 🟩 green sticky on the corner of your laptop screen so instructors know you’re ready!
- If startup takes longer than a couple of minutes, put up a 🟥 red sticky and we’ll take a look!
Step 0b: Create and clone a new repository for this workshop’s exercises
Create a new repository in GitHub from our workshop template repository.
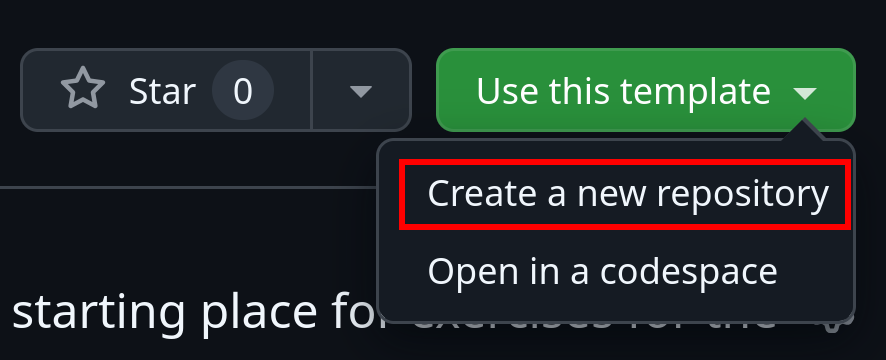
Click the green “Use template” button in the upper-right, then select “create a new repository”.
Leave most of the settings as default: your username should be the “owner”, and the repo should be public. Set the “Repository name” to
workshop-csdms2025-exercises-- this will make it easier for us to find it!In JupyterHub, clone the new repository you just created from the template. We’ll be working here from now on!
- Create a new tab in JupyterHub with the ➕ icon.
- Launch a terminal.
- In the terminal, Run the command below, replacing
MY-USERNAMEwith your GitHub account username.
git clone https://github.com/MY-USERNAME/workshop-csdms2025-exercises
Step 0c: Set up GitHub authentication
In order to push changes from the JupyterHub to GitHub to save our work, you need
credentials.
Since the JupyterHub is a shared cloud service, saving credentials there can be
dangerous.
Therefore, we use a special tool,
gh-scoped-creds,
to limit this risk.
- Navigate to the newly cloned repository in the JupyterLab file browser on the
left panel.
- If the left panel isn’t open, click the topmost icon in the far left column.
- Enter the directory
examples/module-1. - Open
00-START-HERE.ipynb(double-click). - Follow the instructions in the Notebook.
This configuration is valid for 8 hours. If you need to refresh your access later, please re-do these steps.
Step 1: Read our example Notebook
- Open
example-1.ipynbby double-clicking it in the file browser in the left panel. - This notebook is pre-populated with some code.
As you read, run the cells by pressing
SHIFT+ENTER. - Fill in the final “Challenge” cells of the Notebook to add more data to the GeoDataFrame. Start with a location that is meaningful to you: Your favorite coffee shop? The shelter where you adopted your pet? The town where you grew up?
- Run the final cells.
Step 2: Save our work to GitHub
Run the following command in the terminal:
git commit --all --message="Complete module 1"Run the following command in the terminal:
git push --set-upstream origin main
You can now visit your repository to verify that it’s been updated. Looking at the time labels is the fastest way to confirm this.
Done!
Put up a 🟩 green sticky to let us know you’ve completed the exercise.
⭐ If you have time left, please check out our bonus example tutorial in examples/bonus/!