Step 1: Set up GitHub Pages
- Open your repository on GitHub.
- Click “⚙️ Settings” towards the top of the page.
- Select “Pages” on the left.
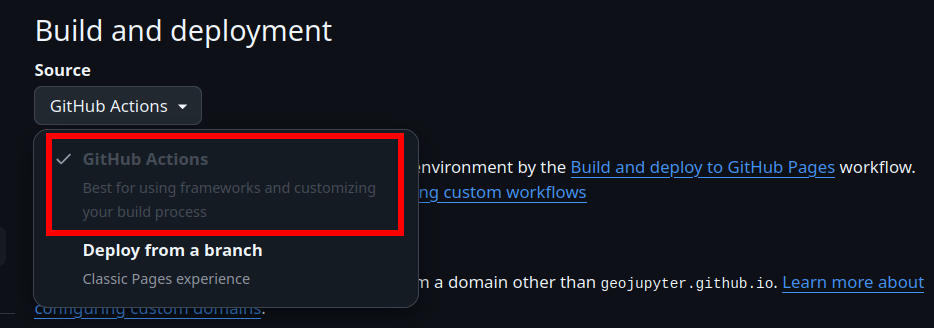
- Switch GitHub Pages to use GitHub Actions as the build & deployment source:
All of the other scaffolding you need is already included in this repo in the
.github/workflows directory.
When you build your own MyST website, you can reproduce this with myst init --site and
myst init --gh-pages.
Step 2: Make a change & save to GitHub
Edit
index.mdinexamples/module-3/my-website. Add any content you like! Consider adding a figure, equation, aside or another element from the MyST documentation (see the “Authoring” section in the sidebar).Commit and push:
git commit --all --message="Edit to trigger GitHub Pages deployment"
git push origin main
Step 3: View your new GitHub Pages deployment!
In your repository, view the GitHub Actions progress.
From the repository home page, click the “Actions” tab towards the top.
You should see an action titled “Edit to trigger GitHub Pages deployment”, matching the commit message from the previous step. Is it complete (green check)? Or is it still in progress? Did it fail (red X)? Let us know if it failed.
View your website. Check that the change you made in the previous step is visible!
- Your website will be available at this URL (replace
MY-USERNAMEwith your username 😉):
https://MY-USERNAME.github.io/workshop-csdms2025-exercises- Your website will be available at this URL (replace
View the page titled “I am an example notebook”. This notebook is rendered as a website, including interactive elements!
Step 4: Edit your notebook to display some data
Edit the file
examples/module-3/my-website/example.ipynbin JupyterHub.Modify the 2nd code cell to add GeoJSON data to the website. Add the following code to the 2nd to last line, before
m:folium.GeoJson("seec_and_nsidc.geojson").add_to(m)Save your notebook.
Step 5: Save to GitHub
git commit --all --message="Complete module 3"
git push origin main
Step 6: View your website!
It may take a minute or two; don’t forget, you can view the progress in the “Actions” tab of your repository.
Check the example notebook rendered correctly on the website.
Done!
Put up a 🟩 green sticky to let us know you’ve completed the exercise.
⭐ If you have time left, please check out our bonus example tutorial in examples/bonus/!